원래 팔굽혀펴기를 못함.
차투랑가가 제대로 될 리 없다.
The infamous Chaturanga Dandasana, a.k.a. the yoga push-up or low plank. Most people, including me, have done it either wrong and/or half-assed for years and this is not a good thing.
Why do people do it wrong?
Because it’s HARD.
And why is this not a good thing?
Because if you do any style of Ashtanga-based yoga, (which most yoga in the U.S. is) it’s the one yoga pose that you will probably do wrong the most times.
Doing a pose wrong over and over again = potential for repetitive motion injuries, and in this case specifically, rotator cuff injuries.
So let’s learn it the right way!
Here's what you’ll need:
- Yoga/exercise mat
- An audience who will appreciate the creative expletives that may come out of your mouth once you are holding the full pose
In order to do the full version of the pose, you must have sufficient arm, shoulder, and abdominal strength. These parts work together in a complicated way to create the perfect alignment here.
If you don’t yet have the strength (or you do and you’re just tired) drop your knees! Don’t be embarrassed to do this. I admit I have been.
But don’t be like me: Try not to have an ego during yoga.
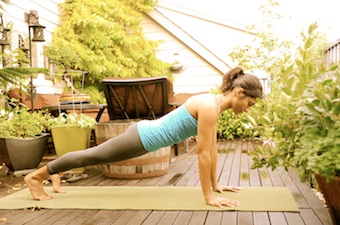 Start from plank:
- Hands under elbows
- Elbows under shoulders
- Abdominals and low ribs pulled in; core engaged
- Thighs pushing up
- Heels pushing back
- Hug all your muscles into the midline of the body
- Roll WAY forward on your toes (see pic below). Even more than you think you should. (This ensures you will lower down with your arms in a 90° angle.)
- Now begin to lower down until your arms form a 90° angle and stop just at that point.
Do this while keeping the following in mind:
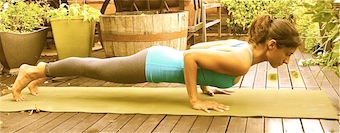
- Keep your core VERY engaged just as in plank—abdominals and ribs really pulled in
- HUG your elbows into the sides of your body
- Keep the tops of your shoulders pulled back away from your ears and pointing straight forward, not drooping down.
- Imagine that you’re trying to make your clavicles SMILE. In other words, broaden through the chest. “Smile your clavicles”.
I love that last tip! I got it from yoga teacher Tiffany Cruikshank over at yogaglo. It was the missing piece I needed to get my Chaturanga right. Just that one tiny tip fixed my pose. I love it when that happens. If this tip means nothing to you, just ignore it.
So that’s it. Chaturanga in a nutshell.
Note: Practice your Chaturanga in front of a mirror or another person at first, so you can see how low you need to go to form a 90 degree angle with your arms. Then it will be stored safely away in your muscle memory.
As I said earlier, if you’re still working on your strength or just feeling tired, drop your knees!
And actually, even if you are able to do the full pose, doing this variation helps you learn proper alignment because you’re still working all the same muscles above the waist, without having to concentrate on carrying all the extra weight of your lower body.
This is how NOT to do the pose.
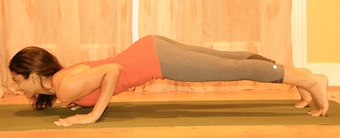
This is what you’ll often see in yoga classes, albeit a bit exaggerated here:
The Ass Hike: This tends to happen when the core is not engaged enough.
The Droopy Shoulders: This happens because most people are stronger in the front of the shoulders and pectoral muscles and are using these primarily instead of the muscles they should be engaging: the rhomboids and serratus anterior muscles, which hold the shoulder girdle together.
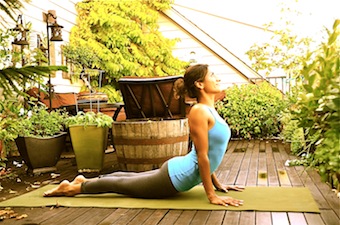
Complete the sequence with Upward Facing Dog.
Ahhh.
Relief!
I hope this short tutorial helped get you closer to a correctly aligned yoga push-up.
If you have any questions, ask away!
Not to worry, even those of us with two left feet can learn to (cha-cha) Chaturanga thanks to West 4th ambassador Elle Basten. Here’s her one-two step 10-step breakdown to up your Vinyasa flow. one-two-cha-cha-cha 1. start by placing your hands on your mat right below your shoulders (in plank) 2. bring the shoulders slightly forward by pressing into the toes and shifting the length of your body forward 3. draw the lower belly in and lengthen your tailbone away to keep your low back long 4. bring your lower ribs up and in towards your spine to keep the middle of your back strong 5. imagine one long straight line from the tip of your tailbone to the crown of your head 6. gaze only slightly forward or straight down to lengthen, keeping the back of your neck long and throat (and airway!) open 7. keep the chest & collarbones broad and open by gently hugging the inner armpits towards one another 8. draw your elbows in line with your shoulders – don’t collapse into the ribs or wing out to the side 9. lower halfway down (bring your knees to the floor if your lower back begins to drop or sag!) 10. ensure that the shoulder heads do not drop below the line of the elbows (they should form a 90-degree angle) – this requires strong triceps! If they do sag, bring your knees to the floor until you can safely make the shift go with the flow Need a visual? See Aventura Mall ambassador, Michelle Wong, work through the flow in this video! Now that you’ve nailed Chaturanga and Headstand, what other poses would you like a step-by-step breakdown of?


'INDIA > 요가' 카테고리의 다른 글
| 요가 - core strength (0) | 2013.11.26 |
|---|---|
| 요가 - 가슴열기 (0) | 2013.11.22 |
